Getting Started with the Raspberry Pi 4
Learn to set up your Raspberry Pi 4B+ with Raspbian Buster
Written By: Cherie Tan
Difficulty
Easy
Steps
12
The new Raspberry Pi 4 is here! While it looks like the same basic size and shape as its Model B predecessor, it comes with an updated Broadcom BCM2711 quad-core Cortex-A72 (ARM v8) 64-bit system-on-chip that runs on 1.5 GHz, as well as many more unexpected tweaks -- making it more powerful than ever!
In this guide, we will walk you through on what's new, and on show you how to set up your Raspberry Pi 4 with Raspbian Buster.
Complete this guide to get started with the Raspberry Pi 4B+.
In this guide, we will walk you through on what's new, and on show you how to set up your Raspberry Pi 4 with Raspbian Buster.
Complete this guide to get started with the Raspberry Pi 4B+.

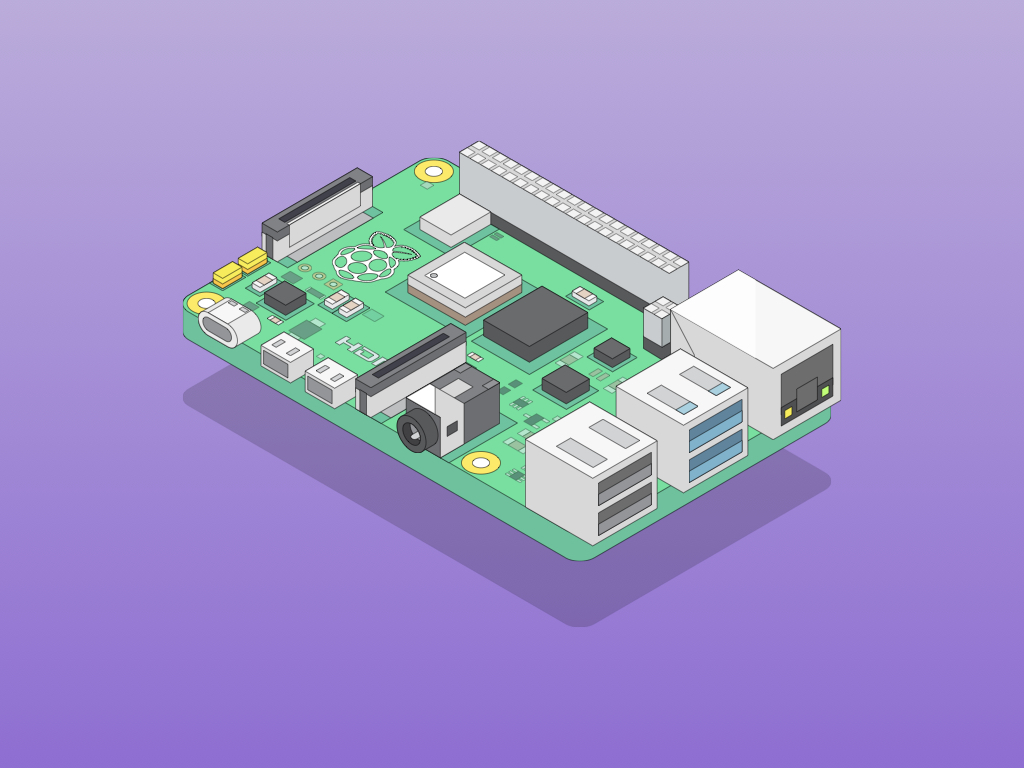
The Raspberry Pi Model 4 B+ offers a big leap in specs from the previous generation Raspberry Pi boards.
As you might have heard, it runs on a 1.5GHz quad-core 64-bit ARM Cortex-A72 CPU (~3× performance) with three variations of the board that have different memory capacities: 1GB, 2GB, or 4GB of LPDDR4 SDRAM.
Let's take a closer look at it and more of its features!
As you might have heard, it runs on a 1.5GHz quad-core 64-bit ARM Cortex-A72 CPU (~3× performance) with three variations of the board that have different memory capacities: 1GB, 2GB, or 4GB of LPDDR4 SDRAM.
Let's take a closer look at it and more of its features!
Broadcom CPU - The new Broadcom BCM2711 system-on-chip (SoC) has the same packaging as its predecessor, but it is more powerful with a vastly improved bandwidth for both memory and external hardware.
USB-A 3.0 ports - Two of the USB ports are now USB 3.0, so you can expect a transmission speed of 5 Gigabits per second (around 625 megabytes per second or 625MB/s), about ten times faster than USB 2.0 (480 megabits per second which is 60 megabytes per second or 60MB/s).
The other two ports are USB 2.0. You can distinguish the USB 3.0 ports by the blue plastic used in the port.
So what does this mean?
Not only can these be used to connect to peripherals such as a keyboard and mouse, other HID devices such as a game controller, but the Pi 4B+ can even be used as a full-fledged file server.
Ethernet port - Full throughput Gigabit ethernet is here! Back then, the Pi 3B+'s LAN7500-series chip controlled the USB ports and Ethernet port, turning a single USB connection into an Ethernet controller. However, everything needed to go through the USB 2.0 connection, and was thus limited to about 300 Mbps.
On the Pi 4, with the Broadcom BCM54213 Gigabit ethernet controller, it is directly connected at full bandwidth to the new SoC, so you can expect 1000Mbps, a true Gigabit performance. Connect the Raspberry Pi to a network via an Ethernet cable, here.
Take a closer look and you will also notice that the Ethernet and USB port positions have also been flipped!
Dual HDMI Ports - Another noticeable difference between the Raspberry Pi 4B+ and its predecessor is the new dual-monitor 4k60fps support. While it requires micro HDMI cables to connect to, this feature is a huge step up from the Pi 3B+, where there was just 1080p60 in one HDMI 1.4 port. Now, we've got 2 x micro HDMI ports and the ability to output to 4Kp60 in each.
This is in part thanks to its powerful GPU, which also supports OpenGL ES 3.0, plus some features of OpenGL ES 3.2.
The two HDMI ports are labelled HDMI0 and HDMI1. If you are connecting only a single monitor, use HDMI0 to connect a monitor to via a HDMI cable, or an appropriate adaptor for a DVI monitor.
5V USB-C (Input power Only) - The power plug is now USB-C with a recommended PSU rating of 3A. However, according to the Raspberry Pi Foundation, "A good quality 2.5A power supply can be used if downstream USB peripherals consume less than 500mA in total."
So, you can use existing 2.5A PSU -- simply use a USB to USB-C adaptor.
Connecting the power supply should always be done last, after you have connected all other components.
So, you can use existing 2.5A PSU -- simply use a USB to USB-C adaptor.
Connecting the power supply should always be done last, after you have connected all other components.
Display Serial Interface (DSI) Connector - This connector accepts a flat ribbon cable that can be used to communicate with an LCD or OLED display screen.
Wireless Module - The Raspberry Pi 4B+ has built-in WiFi unlike older models such as the Raspberry Pi 1 Model A+ or Raspberry Pi Zero. This is the wireless module on the board.
Note: As it was for the Raspberry Pi 3B+, 802.11ac is now supported, which means the Pi can do WiFi at 5 GHz as well as 2.4 GHz.
Note: As it was for the Raspberry Pi 3B+, 802.11ac is now supported, which means the Pi can do WiFi at 5 GHz as well as 2.4 GHz.
Bluetooth 5.0 (and BLE) - Longer range and less power used. An upgrade from the Pi 3B+ and its Bluetooth 4.2 capabilities.
MicroSD card slot - This is where you insert the microSD card, normally where the operating system software and files are stored.
Camera Serial Interface Connector (CSI Connector) - This port allows a camera module to be connected directly to the board.
40-Pin GPIO Header - These pins allow you to connect electronic components such as sensors and actuators i.e. LEDs and buttons to the Raspberry Pi.
3.5mm audio & composite video jack - Connect headphones or speakers here.
NOOBS is an easy to use operating system install manager, with it, you can quickly get the Raspbian operating system on the Raspberry Pi. Here at Little Bird, we stock microSD cards already pre-loaded with NOOBS.
If you haven't already got a NOOBS MicroSD card, you can create your own by following our guide, 'Create a NOOBS MicroSD Card'. Once complete, come back to this guide.
Alternatively, you could directly download Raspbian and flash it to an empty microSD card. At this time of writing, Raspbian Buster is the latest version of Raspbian, and is required for the Raspberry Pi 4.
First, insert the microSD card into the Raspberry Pi.
If you have a Raspberry Pi case, such as the Official Raspberry Pi 4 Red/White enclosure, insert the microSD card after you've put the Pi in the case.
Next, connect a mouse and keyboard via USB to the Raspberry Pi's USB ports.
Any standard or generic USB mouse can be used, and we recommend using a wired USB keyboard.
There are two micro HDMI ports on the Raspberry Pi 4! If you are going to use a single monitor, insert a microHDMI cable into the Raspberry Pi 4's HDMI0 port. Then connect the HDMI end to a monitor using the same cable.
The HDMI port on the Raspberry Pi is OUTPUT ONLY for connecting to HDMI monitor devices, do not connect to the HDMI output of the Raspberry Pi to the output of laptops or tablets.

Next, insert the power supply cable into the 5V USB-C port.
As noted above in the overview, the power plug is now USB-C, and the official power supply is now a 3A (5V) unit.
However, the 2.5A PSU used for the Pi 3B+ can still be used, as long as downstream USB peripherals consume less than 500mA in total. To use it, attach a micro USB to USB-C adaptor.
However, the 2.5A PSU used for the Pi 3B+ can still be used, as long as downstream USB peripherals consume less than 500mA in total. To use it, attach a micro USB to USB-C adaptor.
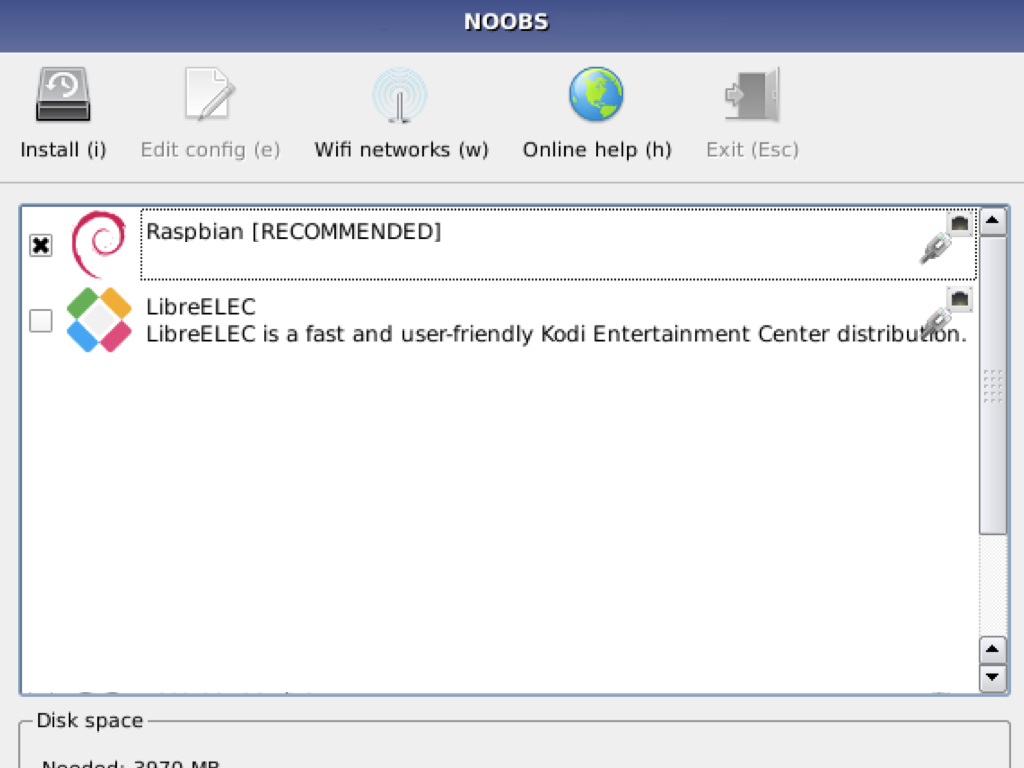
Select the checkbox next to the Raspbian option.
Click 'Install' and Raspbian will then run through its installation process. This can take a few minutes. You are now ready to use Raspbian!
By default, there will only be two options: Raspbian and LibreELEC. However, if connected to the internet, more options will show up such as Raspbian Lite, Lakka, OSMC, etc.
Once Raspbian Buster is started up, you will see the setup wizard. This is where you can set your country, language, enter a password for your Raspberry Pi, and connect to a Wi-Fi network.
If you do want to use the setup wizard again, you can do so by accessing the terminal. Click on the terminal icon on the top left-hand corner and enter the command: sudo piwiz
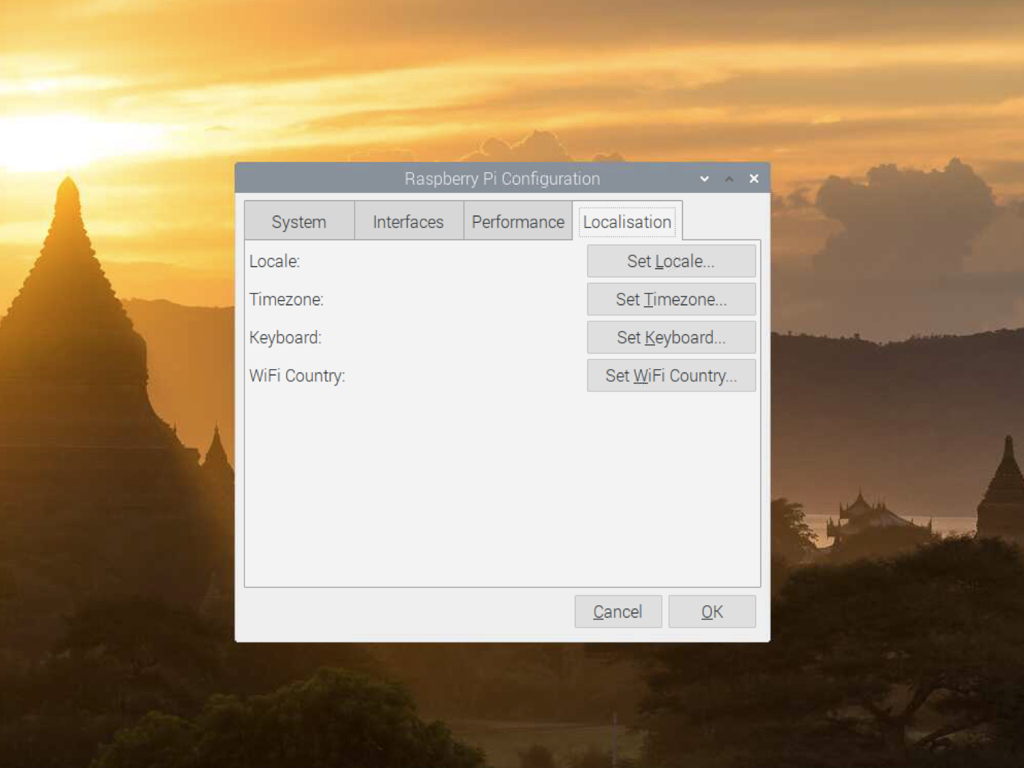
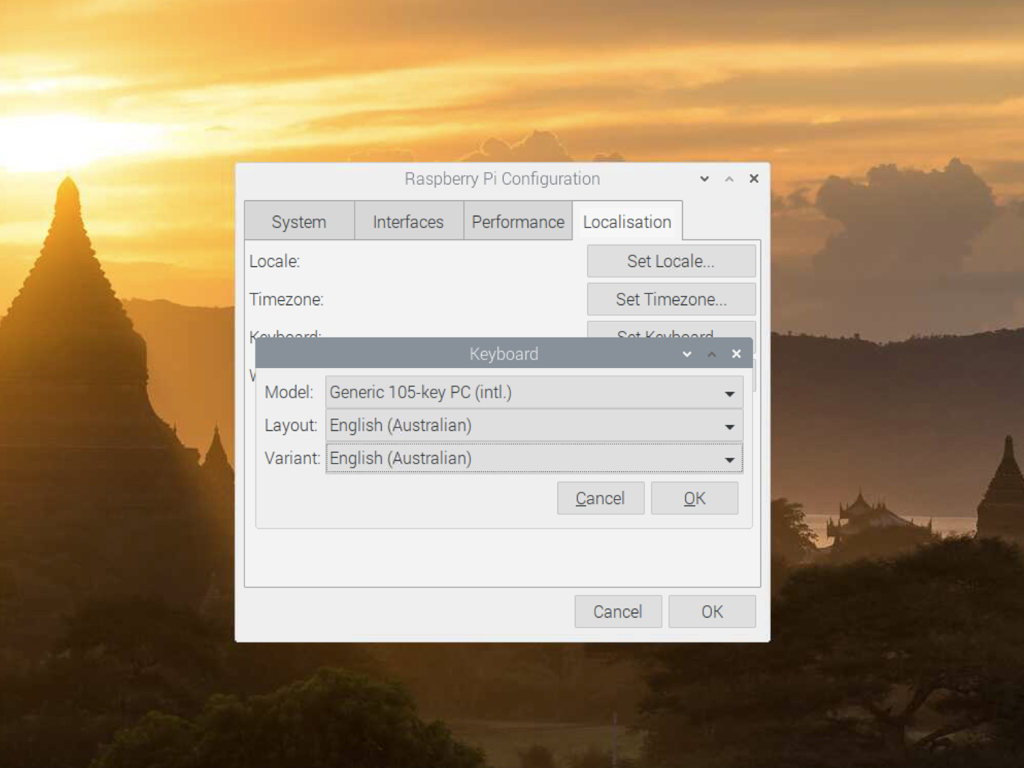
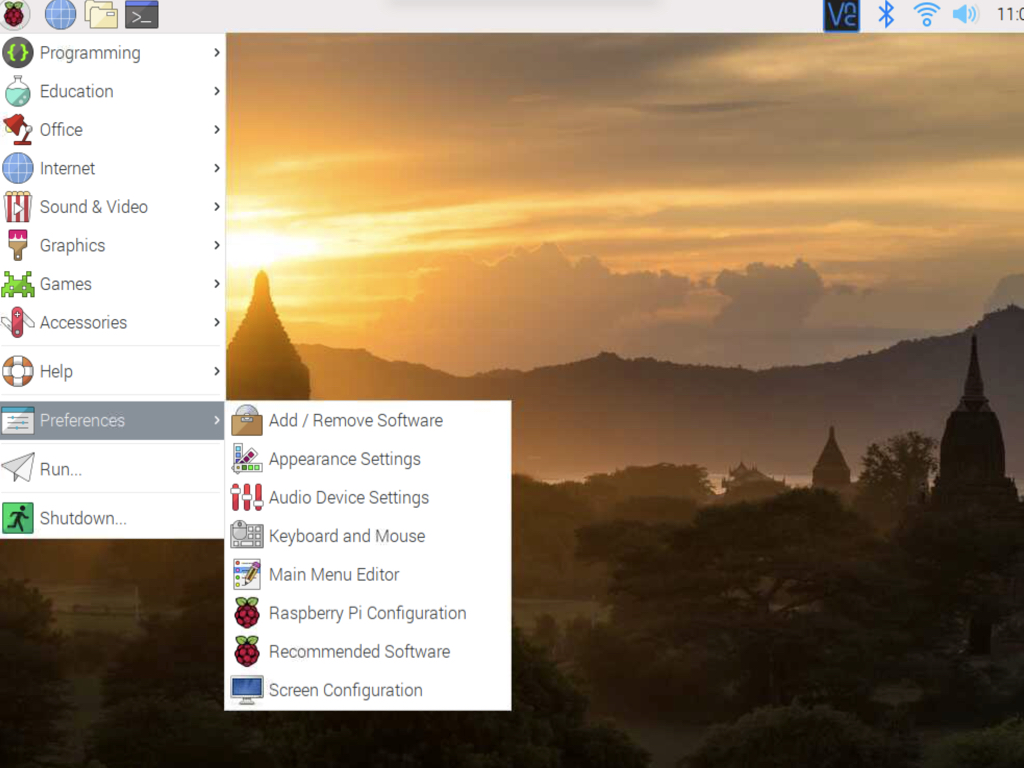
To change the keyboard and country codes without going through the whole setup wizard process again, first go to Preferences > Raspberry Pi Configuration
Click on 'Localisation'
Click on 'Set Keyboard'
Change the Model, Layout and Variant as required.
Alternatively, you can also change it via the terminal. To access the terminal, click on the terminal icon on the top left-hand corner.
1. Enter the command: sudo nano /etc/default/keyboard
2. Change XKBLAYOUT="gb" to XKBLAYOUT="au".
3. To save changes, hit 'CTRL + X' and then 'Y' then 'Enter'.
1. Enter the command: sudo nano /etc/default/keyboard
2. Change XKBLAYOUT="gb" to XKBLAYOUT="au".
3. To save changes, hit 'CTRL + X' and then 'Y' then 'Enter'.

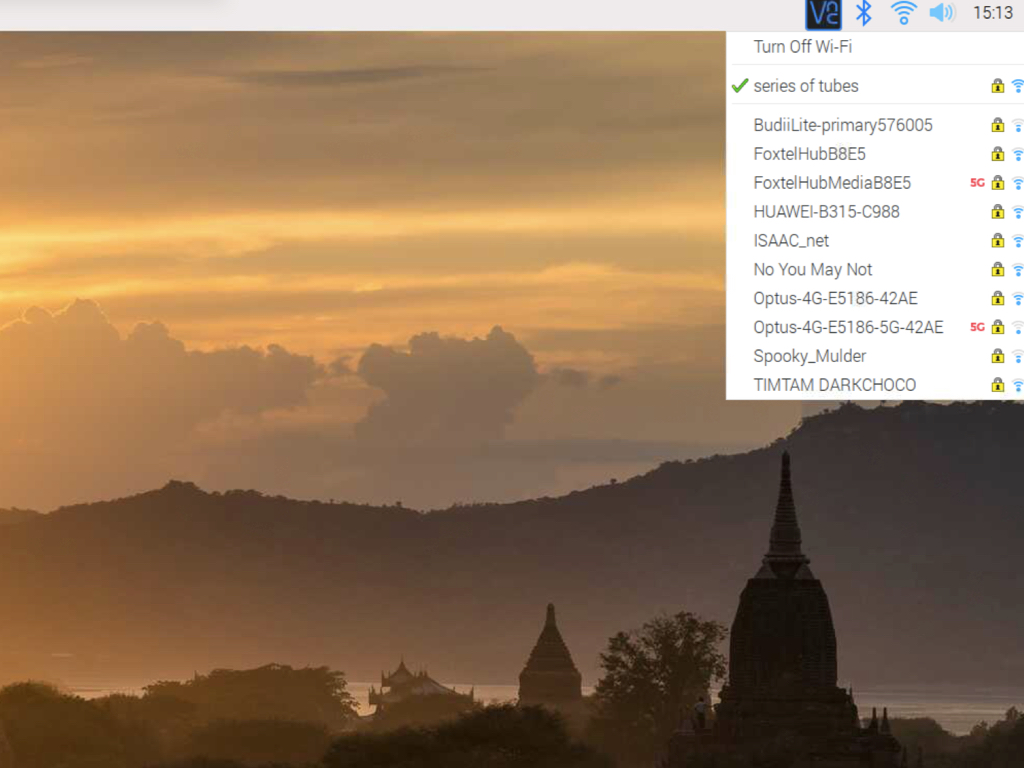
Likewise, if you want to change your network connection or re-connect to it without the setup wizard: First, left-click on the WiFi icon on the top right-hand corner of Raspbian.
Choose your network
Enter network credentials
Once successfully connected, you should see a green tick icon next to the name of your network.
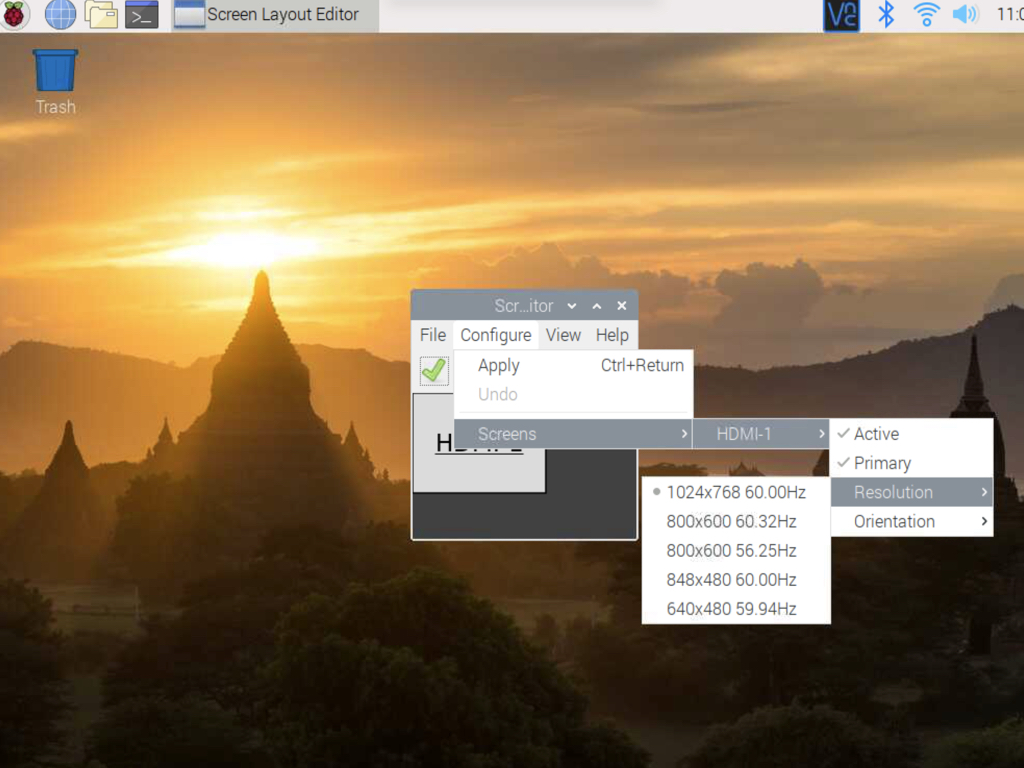
If the Pi 4 is not outputting to a display but works on other displays, it may be a resolution issue. To fix this, first determine the resolution requirements of your target monitor.
Then connect the Pi using the microHDMI to HDMI cable to a monitor that works.
Next, click on the Raspberry Pi icon up the top left-hand corner and navigate to Preferences > Screen Configuration.
To change the resolution, navigate to Configure > Screens > HDMI > Resolution
You're all done with setting up your Raspberry Pi 4 with Raspbian, running with WiFi connectivity, as well as proper keyboard layout!
As the Pi 4 will run a little hot, you may want to look into getting some heatsinks or a miniature cooling fan (or even one that comes with a protective case and miniature fan) that can be connected to the Pi's GPIO pins. Check out our guide on where and how to attach the heatsinks to the Raspberry Pi 4.
As the Pi 4 will run a little hot, you may want to look into getting some heatsinks or a miniature cooling fan (or even one that comes with a protective case and miniature fan) that can be connected to the Pi's GPIO pins. Check out our guide on where and how to attach the heatsinks to the Raspberry Pi 4.