First Steps with Bird Bot
Program the Bird Bot to move forward, backward, turn and brake!
Written By: Cherie Tan
Difficulty
Easy
Steps
12
In the previous guide, we assembled the Bird Bot in just twelve steps. Now we are ready to start programming it!
In this guide, learn to program the Bird Bot to move forward, reverse, turn left, turn right, and brake using Microsoft MakeCode.
Complete this guide to take your first steps into robotics with the Bird Bot.
In this guide, learn to program the Bird Bot to move forward, reverse, turn left, turn right, and brake using Microsoft MakeCode.
Complete this guide to take your first steps into robotics with the Bird Bot.
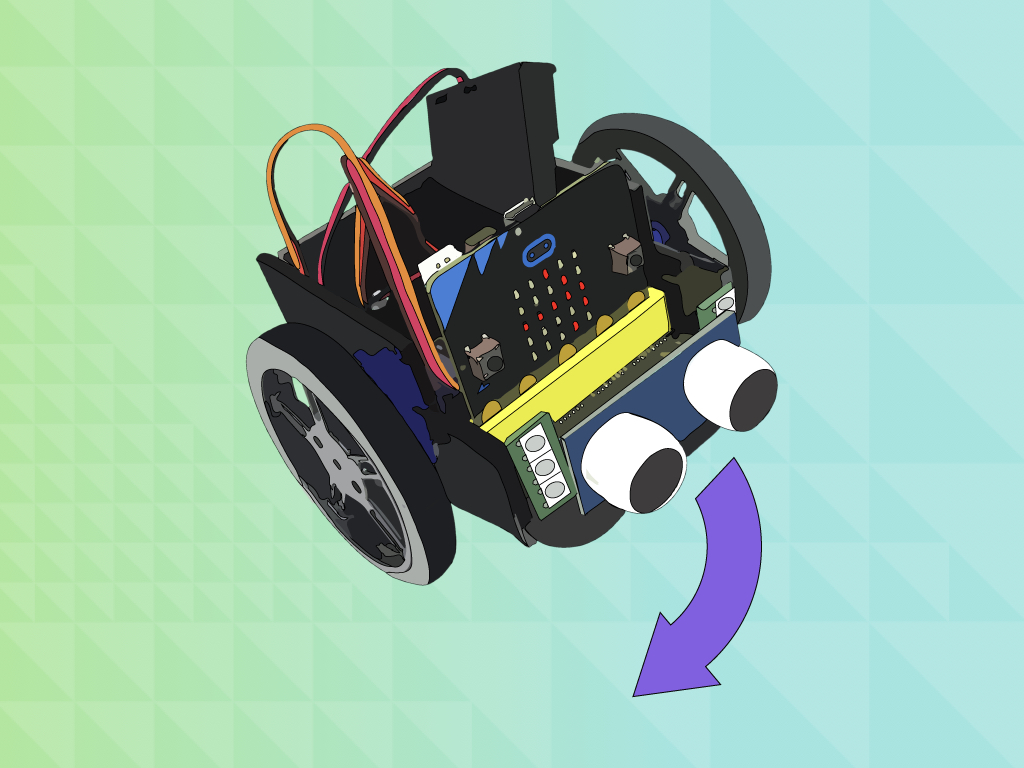
The micro:bit on its own is inexpensive, easy-to-use, and has a slew of built-in capabilities such as an LED matrix, two programmable push buttons, accelerometer, compass, as well as a radio and bluetooth antenna to communicate with other micro:bits. With the Bird Bot, it can be turned into a full-featured, mobile robot buggy very quickly. Once connected to the edge-connector found on an assembled Bird Bot, it is ready to be programmed!
There are many different programming languages we could use to program the Bird Bot. We could program it with Scratch 3.0, Blocks in Microsoft MakeCode, Javascript (also in Microsoft Makecode), or MicroPython using MU Editor. In this guide, we will be programming in the Microsoft MakeCode editor where the same code can be easily swapped between the Blocks and Javascript interfaces.
New to the Microsoft MakeCode editor? See our guide on setting up the micro:bit with MakeCode.
A mobile robot is capable of locomotion, which is the ability to move around its environment and in the Bird Bot's case, with wheels. They are used in many applications throughout the world in plenty of places, from factories to homes and hospitals, as well as in search and rescue operations.
In this guide, begin your first steps with the Bird Bot, we'll show you how to program the Bird Bot to move forward, move in reverse, turn right, turn left, and get it to stop.
In this guide, begin your first steps with the Bird Bot, we'll show you how to program the Bird Bot to move forward, move in reverse, turn right, turn left, and get it to stop.
input.onButtonPressed(Button.A, function () {
    pins.digitalWritePin(DigitalPin.P8, 1)
    pins.servoWritePin(AnalogPin.P8, 180)
    pins.digitalWritePin(DigitalPin.P16, 1)
    pins.servoWritePin(AnalogPin.P16, 0)
})
First, navigate to Microsoft MakeCode
Click on 'New Project'
Copy and paste this code to the Javascript interface
pins.digitalWritePin(DigitalPin.P8, 1) sets pin 8 of the micro:bit to '1' or HIGH. This pin is connected to the right servo of the Bird Bot. Likewise, pins.digitalWritePin can be used to set digital pin 16 to '1' or HIGH, this is connected to the left servo.
pins.servoWritePin writes a value to the servo, controlling the shaft accordingly. As we're using continuous rotation servos, this will set the speed of the servo. By setting it to '0', it will be in full-speed but in one direction. Set it to '180' and it will also be in full-speed but this time in the other direction. For no movement, set it to a value of '90'.
You may notice that we have set the second parameter to 180 in pins.servoWritePin for pin 8, but for pin 16 this is set to 0. Why? Take a look at the orientation of the servos on the Bird Bot!
You may notice that we have set the second parameter to 180 in pins.servoWritePin for pin 8, but for pin 16 this is set to 0. Why? Take a look at the orientation of the servos on the Bird Bot!
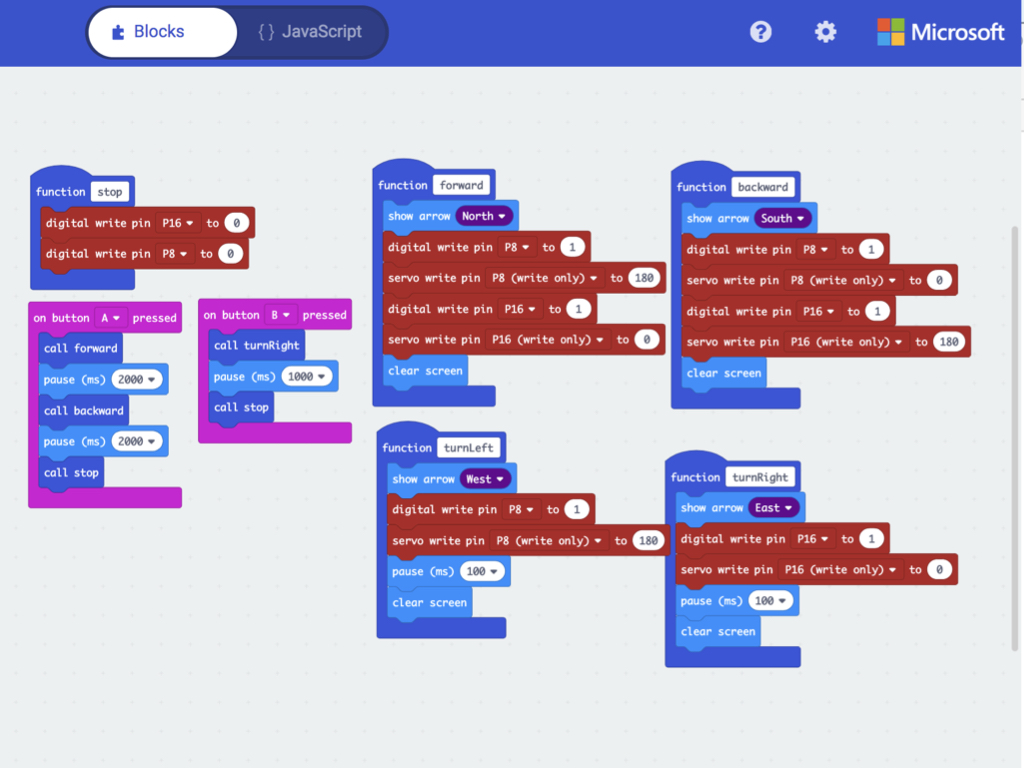
While we have used the Javascript interface, this code can also be seen in the Blocks interface. Go ahead and click on the 'Blocks' button up the top middle section of the MakeCode editor. For the rest of this guide, we will be providing Javascript code, but feel free to take a look at it in Blocks.
input.onButtonPressed(Button.A, function () {
    pins.digitalWritePin(DigitalPin.P8, 1)
    pins.servoWritePin(AnalogPin.P8, 180)
    pins.digitalWritePin(DigitalPin.P16, 1)
    pins.servoWritePin(AnalogPin.P16, 0)
})
input.onButtonPressed(Button.B, function () {
    pins.digitalWritePin(DigitalPin.P8, 0)
    pins.digitalWritePin(DigitalPin.P16, 0)
})
Next, let's program the Bird Bot to stop. Copy and paste the following code into the Javascript interface.
input.onButtonPressed(Button.A, function () {
    pins.digitalWritePin(DigitalPin.P8, 1)
    pins.servoWritePin(AnalogPin.P8, 0)
    pins.digitalWritePin(DigitalPin.P16, 1)
    pins.servoWritePin(AnalogPin.P16, 180)
})
input.onButtonPressed(Button.B, function () {
    pins.digitalWritePin(DigitalPin.P8, 0)
    pins.digitalWritePin(DigitalPin.P16, 0)
})
Replace the previous code for button A with the following to get the Bird Bot to move in reverse.
The code for button B has remained the same, this is programmed to stop the Bird Bot from moving once button B has been pressed.
input.onButtonPressed(Button.A, function () {
    pins.digitalWritePin(DigitalPin.P8, 1)
    pins.servoWritePin(AnalogPin.P8, 180)
    basic.pause(100)
})
input.onButtonPressed(Button.B, function () {
    pins.digitalWritePin(DigitalPin.P8, 0)
})
Add the following code for the Bird bot to turn left when button A is pressed.
Adjust the value of basic.pause for it to turn left for longer. Try removing basic.pause and see what happens. You may notice that the Bird Bot continues to spin anti-clockwise!
input.onButtonPressed(Button.A, function () {
    pins.digitalWritePin(DigitalPin.P16, 1)
    pins.servoWritePin(AnalogPin.P16, 0)
    basic.pause(100)
})
input.onButtonPressed(Button.B, function () {
    pins.digitalWritePin(DigitalPin.P16, 0)
})
The following code gets the Bird bot to turn right when button A is pressed.
Likewise, try removing basic.pause and see what happens. This time, the Bird Bot should continuously spin in a clock-wise direction.
function forward() {
    pins.digitalWritePin(DigitalPin.P8, 1);
    pins.servoWritePin(AnalogPin.P8, 180);
    pins.digitalWritePin(DigitalPin.P16, 1);
    pins.servoWritePin(AnalogPin.P16, 0);
}

function backward() {
    pins.digitalWritePin(DigitalPin.P8, 1);
    pins.servoWritePin(AnalogPin.P8, 0);
    pins.digitalWritePin(DigitalPin.P16, 1);
    pins.servoWritePin(AnalogPin.P16, 180);
}

function turnLeft() {
    pins.digitalWritePin(DigitalPin.P8, 1);
    pins.servoWritePin(AnalogPin.P8, 180);
    basic.pause(100);
}

function turnRight() {
    pins.digitalWritePin(DigitalPin.P16, 1);
    pins.servoWritePin(AnalogPin.P16, 0);
    basic.pause(100);
}

function stop() {
    pins.digitalWritePin(DigitalPin.P16, 0);
    pins.digitalWritePin(DigitalPin.P8, 0);
}
Create a function for backward
Next, create a function, turnLeft
Then, create another function and name it turnRight
Finally, create another function and name it stop
Now that we know how to get the Bird Bot to move forward, backward, turn right, turn left, and brake, let's program it to move in a sequence of different movements. Rather than re-writing the same code over and over again, let's place them in functions. So go ahead and create your first function and name it forward then place the existing code into the function.
function forward() {
    pins.digitalWritePin(DigitalPin.P8, 1);
    pins.servoWritePin(AnalogPin.P8, 180);
    pins.digitalWritePin(DigitalPin.P16, 1);
    pins.servoWritePin(AnalogPin.P16, 0);
}
function backward() {
    pins.digitalWritePin(DigitalPin.P8, 1);
    pins.servoWritePin(AnalogPin.P8, 0);
    pins.digitalWritePin(DigitalPin.P16, 1);
    pins.servoWritePin(AnalogPin.P16, 180);
}
function turnLeft() {
    pins.digitalWritePin(DigitalPin.P8, 1);
    pins.servoWritePin(AnalogPin.P8, 180);
    basic.pause(100);
}
function turnRight() {
    pins.digitalWritePin(DigitalPin.P16, 1);
    pins.servoWritePin(AnalogPin.P16, 0);
    basic.pause(100);
}
function stop() {
    pins.digitalWritePin(DigitalPin.P16, 0);
    pins.digitalWritePin(DigitalPin.P8, 0);
}
input.onButtonPressed(Button.B, function () {
    turnRight();
    basic.pause(1000);
    stop();
})
input.onButtonPressed(Button.A, function () {
    forward();
    basic.pause(2000);
    backward();
    basic.pause(2000);
    stop();
})
With the following code, now on button A press, the Bird Bot will move forwards for 2 seconds before moving backwards for 2 seconds.
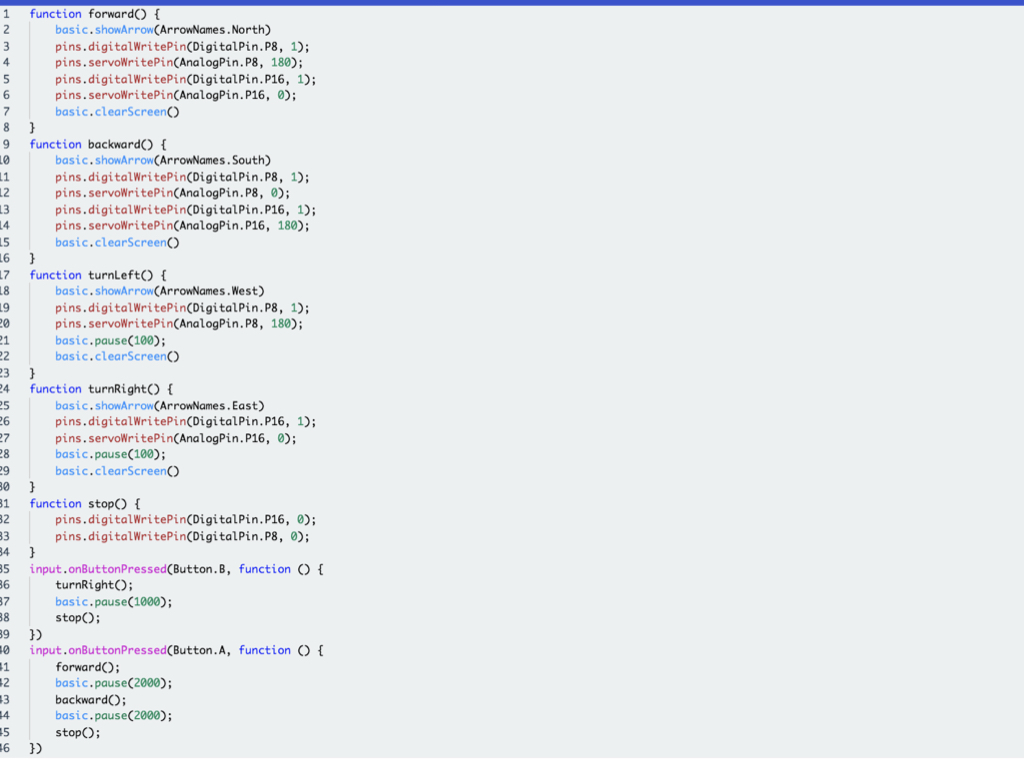
function forward() {
    basic.showArrow(ArrowNames.North)
    pins.digitalWritePin(DigitalPin.P8, 1);
    pins.servoWritePin(AnalogPin.P8, 180);
    pins.digitalWritePin(DigitalPin.P16, 1);
    pins.servoWritePin(AnalogPin.P16, 0);
    basic.clearScreen()
}
function backward() {
    basic.showArrow(ArrowNames.South)
    pins.digitalWritePin(DigitalPin.P8, 1);
    pins.servoWritePin(AnalogPin.P8, 0);
    pins.digitalWritePin(DigitalPin.P16, 1);
    pins.servoWritePin(AnalogPin.P16, 180);
    basic.clearScreen()
}
function turnLeft() {
    basic.showArrow(ArrowNames.West)
    pins.digitalWritePin(DigitalPin.P8, 1);
    pins.servoWritePin(AnalogPin.P8, 180);
    basic.pause(100);
    basic.clearScreen()
}
function turnRight() {
    basic.showArrow(ArrowNames.East)
    pins.digitalWritePin(DigitalPin.P16, 1);
    pins.servoWritePin(AnalogPin.P16, 0);
    basic.pause(100);
    basic.clearScreen()
}
function stop() {
    pins.digitalWritePin(DigitalPin.P16, 0);
    pins.digitalWritePin(DigitalPin.P8, 0);
}
input.onButtonPressed(Button.B, function () {
    turnRight();
    basic.pause(1000);
    stop();
})
input.onButtonPressed(Button.A, function () {
    forward();
    basic.pause(2000);
    backward();
    basic.pause(2000);
    stop();
})
Finally, let us add some visuals that reflects its movement. Use basic.showArrow to display arrows corresponding to the direction that the Bird Bot is moving. For example, if it is moving forward, display an arrow pointing north on the LED matrix display.
Add a basic.clearScreen to the end of the function so that the arrow is only displayed briefly before it is cleared from the LED matrix display.
Use basic.showArrow for the backwards function too, but with a south arrow instead.
Then, display an arrow pointing west within turnLeft function.
Finally, display an arrow pointing east within the turnRight function.
Click on the Blocks button to view the code in Blocks.
Switch back to the Javascript interface to view the complete code in Javascript.
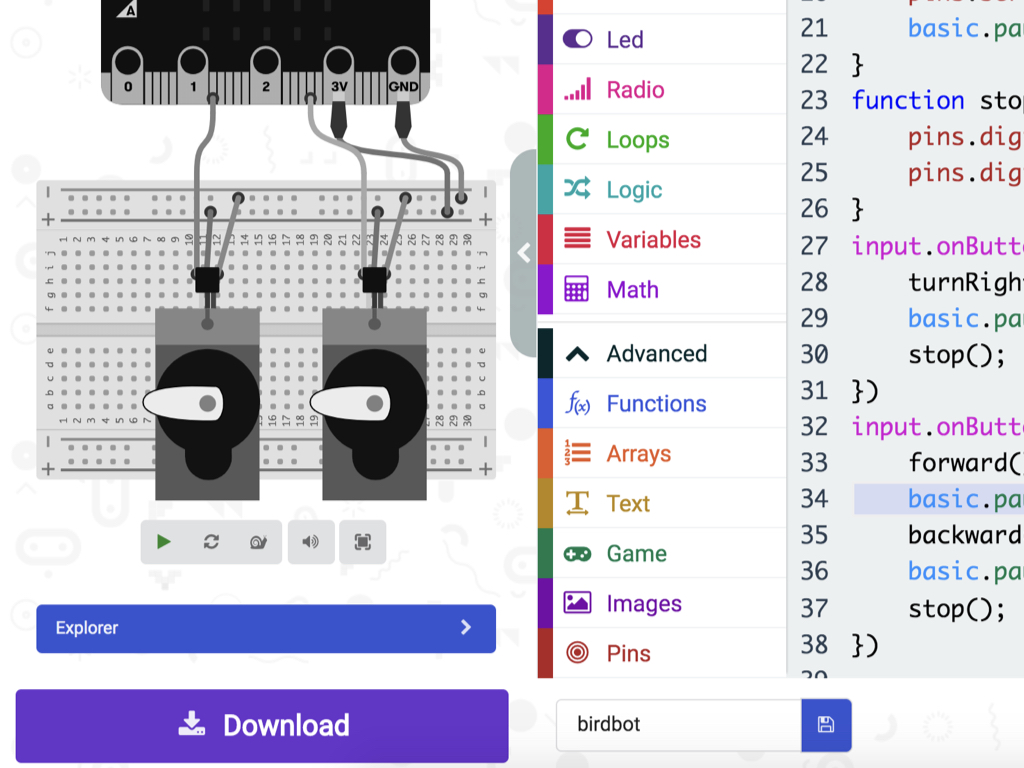
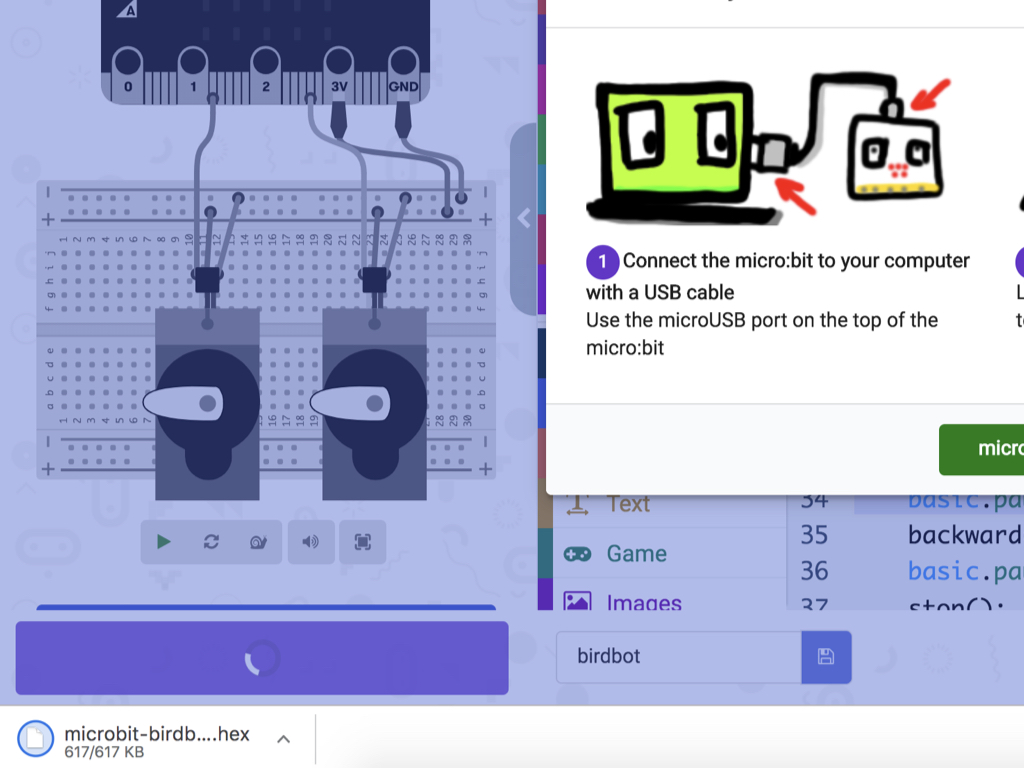
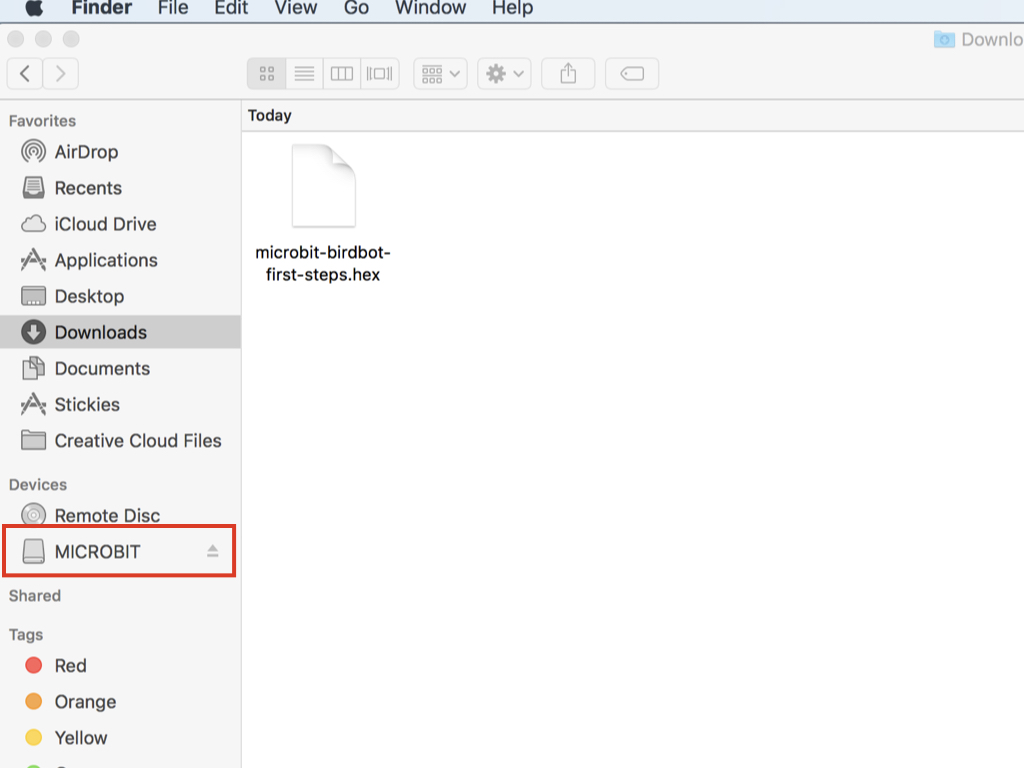
Click on the Download button
After connecting the micro:bit via micro USB cable to the computer, drag and drop the microbit-birdbot-first-steps.hex file into the MICROBIT drive
Feel free to download a copy of the complete program or hex file here.
Well done on completing your first steps with the Bird Bot! In the next guide, we will show you how to control the Bird Bot with another micro:bit using Bluetooth.
Check out the guides over at https://www.littlebird.com.au/a/how-to/#micro-bit to learn even more.