millis() function and Arduino
Learn to use the millis() function to create a simple multi-tasking alarm
Written By: Cherie Tan
Difficulty
Medium
Steps
8
In our previous guide on how to Make a Sound with a Piezo Buzzer, the tone() function and delay() function were used to generate sound. Instead of using delay(), we can use millis(), with the added advantage of multi-tasking.
In this guide, learn to use the millis() function instead to create an alarm sound. You will learn about the difference between the delay() function and millis() function, as well as when to use the latter.
Complete this guide to learn to use the millis() function in your Arduino sketches.
In a previous Arduino guide, we've showed you how to make sound with a piezo buzzer. In the sketches included in that guide, the delay() function was used to create a pause in the program.
However, you can also use the millis() function. In this guide, learn when, how, and why to use millis() instead of delay().
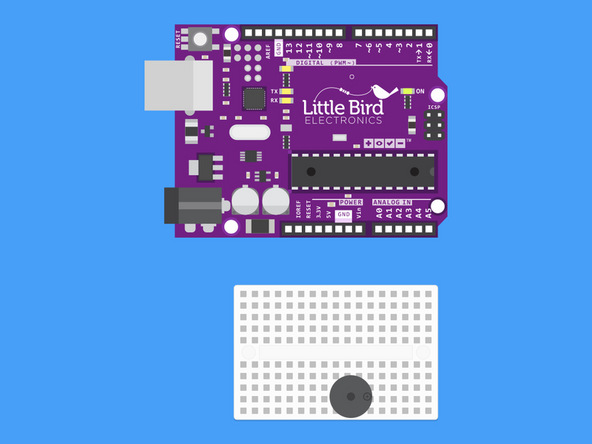
There are markings on the buzzer which indicate the positive and negative pins.
Plug your Buzzer in so that the positive pin is on the right hand side.
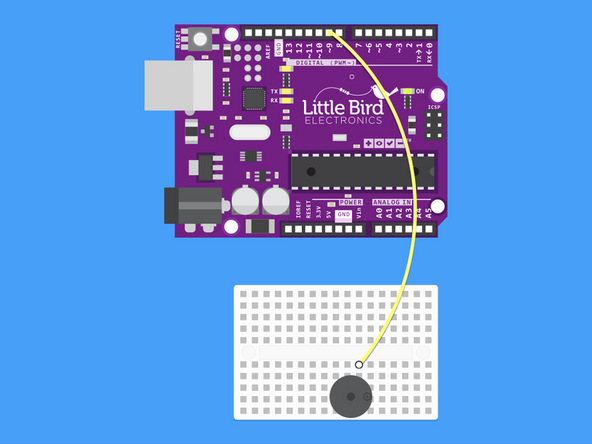
Connect the Digital Pin 9 to the Buzzer's positive pin.

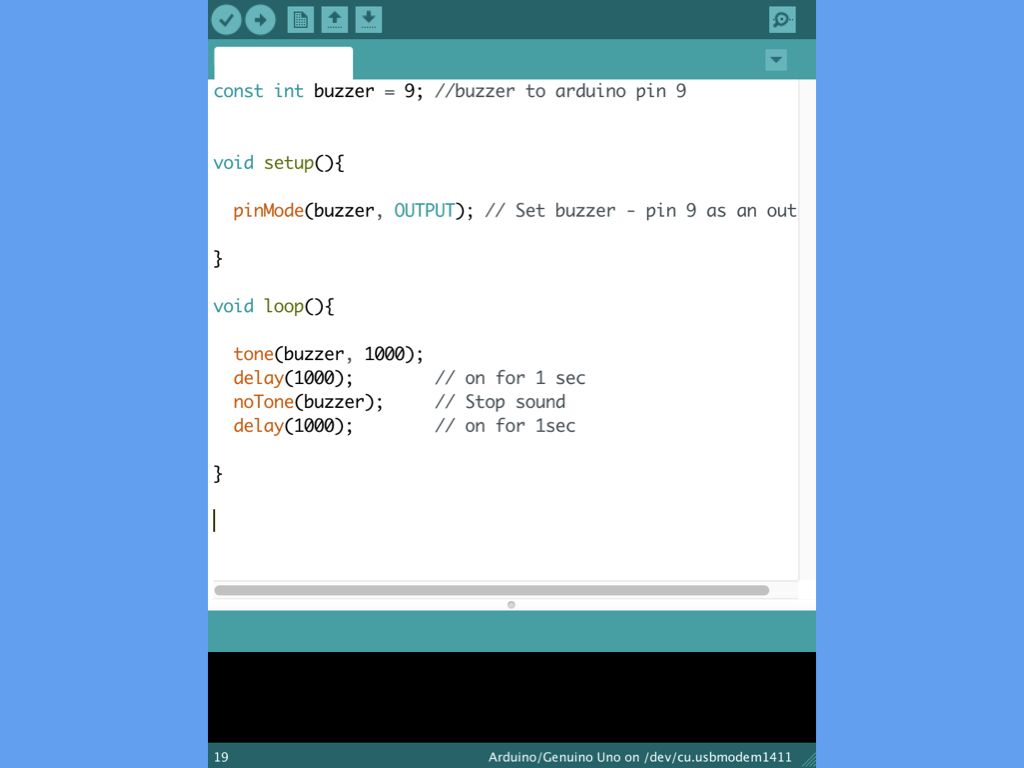
const int buzzerPin = 9;
const int LED = 13;

void setup () {
  pinMode(buzzerPin, OUTPUT);
  pinMode(LED, OUTPUT);
}

void loop () {
  tone(buzzerPin, 1000, 500);
  delay(3000);
  digitalWrite(LED, HIGH);
  delay(1000);
  digitalWrite(LED, LOW);
  delay(1000);
}
Copy and paste this sketch into the Arduino IDE.
In the loop() function, the buzzer will beep at a frequency of 1000 Hz and a duration of 500 milliseconds. This is followed by a delay of 3 seconds, and then an LED flashing on and off. This will repeat as long as the Arduino is powered on.
The problem with this sketch is that you can only see the LED flashing after the buzzer has finished generating sound. In some cases, you may want both to happen at the same time. If so, you need to make sure the loop does not have any delays in it.
int LED = 13;
bool ledState;

void setup() {
  Serial.begin(9600);
  pinMode(LED, OUTPUT);     // initialize the digital pin as an OUTPUT
  digitalWrite(LED, HIGH);  // turn LED on
  ledState = true;          // LED is on
}

void loop() {
  if (ledState == HIGH) {
    delay(5000);
    digitalWrite(LED, LOW); // turn LED off
    ledState = false;  // prevent this code being run more then once
    Serial.println("Turned LED Off");
  }
  //Other loop code here
  Serial.println("Run other code");
}
In the previous code, we used the delay() function when we needed the Arduino to pause briefly.
However, when you want to get the Arduino to multi-task, for instance, to get a reading on the serial monitor and the buzzer to beep at the same time, delay() will not do. Using delay() pauses your Arduino program, making it incapable of doing anything else in that time period. Instead, use the millis() function.
But first, here is another example showing when not to use the delay() function, this time by using Serial.println().
Open up the Serial Monitor by navigating to Tools > Serial Monitor
Upload the code to the Little Bird Uno R3
On start up, the setup() method is called once. Then, the loop() method is called, where the condition if (ledState == HIGH) is met, so the delay(5000) pauses the program for 5 seconds before turning the LED off. With the Serial monitor open, you'll notice that "Run other code" is not printed out for the first 5 seconds. It is only after the LED is turned off does it print out very quickly, as loop() is called over and over again.
const int LED = 13; // the number of the built-in LED pin
int ledState = LOW;

// Generally, you should use "unsigned long" for variables that hold time
// The value will quickly become too large for an int to store
unsigned long previousMillis = 0;  // will store last time LED was updated

const long interval = 5000; // interval at which to blink (milliseconds)

void setup() {
  Serial.begin(9600);
  pinMode(LED, OUTPUT);   // initialize the digital pin as an output.
}

void loop() {
  unsigned long currentMillis = millis();

  if (currentMillis - previousMillis >= interval) {
    // save the last time you blinked the LED
    previousMillis = currentMillis;

    // if the LED is off turn it on and vice-versa:
    if (ledState == LOW) {
      ledState = HIGH;
    } else {
      ledState = LOW;
    }
    // set the LED with the ledState of the variable:
    digitalWrite(LED, ledState);
  }
  //  Other loop code here
 Serial.println("Run Other Code");

}
millis() is a built-in method of the Arduino library, and it returns the number of milliseconds that the sketch has been running, or since the board has been powered up. It starts at zero milliseconds each time the board is reset, and is incremented each millisecond by a CPU hardware counter.
An unsigned long variable is created to store the last time that the LED was updated. You should use unsigned long for variables that hold time, as the value quickly becomes too large for an int to store.
The ledState variable contains an on/off state, so when it needs to be toggled, you'll know what the LED's current state is.
The first if statement checks whether the current millis count with the previous millis count subtracted from it, is bigger than or equal to the set interval (in this case, 5000 milliseconds or 5 seconds). This means that the if statement within it will only run if more than interval milliseconds has elapsed.
Try it out yourself or work it out on paper:
If four milliseconds have passed since the Arduino has been powered, then check to see if currentMillis - previousMillis >= interval.
4 seconds - 0 seconds >= 3 seconds ?
No. So the code within the if statement does not run.
No. So the code within the if statement does not run.
If five milliseconds have passed since the Arduino has been powered, then check again:
currentMillis - previousMillis >= interval
5 seconds - 0 seconds >= 3 seconds?
Yes. Now the code within the if statement does run. The currentMillis which is 5 seconds is saved to previousMillis. The next if statement will toggle the LED on if it is off, and vice versa.
Yes. Now the code within the if statement does run. The currentMillis which is 5 seconds is saved to previousMillis. The next if statement will toggle the LED on if it is off, and vice versa.
Next, six milliseconds have passed since the Arduino has been powered, so:
currentMillis - previousMillis >= interval
6 seconds - 5 seconds = 1 second and we know that 1 second is not bigger than or equal to 3 seconds. So, the code within does not run. This checking goes on and on.
Copy and paste the following code into the Arduino IDE, and upload it to the Little Bird Uno R3.
Open up the Serial Monitor. "Run Other Code" will be repeatedly printed very quickly over and over again. While it does so, the built-in LED on digital pin 13 will turn on and off every three seconds.
const int buzzerPin = 9;
const int onDuration = 1000;
const int periodDuration = 5000;

unsigned long lastPeriodStart;

void setup () {

  pinMode(buzzerPin, OUTPUT);
  Serial.begin(9600);

}

void loop () {
  if (millis() - lastPeriodStart >= periodDuration) {
    lastPeriodStart += periodDuration;
    tone(buzzerPin, 550, onDuration);
  }

  //  Other loop code here . . .
  Serial.println("Run Other Code");

}
Replace the code in the Arduino IDE with the following, and upload it to the Little Bird Uno R3.
In this sketch, the millis() function was used instead. As before in the millis() example sketch, "Run Other Code" will be repeatedly printed onto the Serial Monitor, even as there is a 'delay' of five seconds between the buzzer's beeps.
This is one example of how to get your program to multi-task with millis(). Instead of pausing the entire program with delay(), the Little Bird Uno R3 is now free to do other tasks while the buzzer is sounding.